

RADON MITIGATION SYSYTEMS
Complete Search Inspections offers professional radon mitigation systems to help keep your home safe and healthy. We offer a comprehensive radon testing and elimination service to ensure your family's safety.
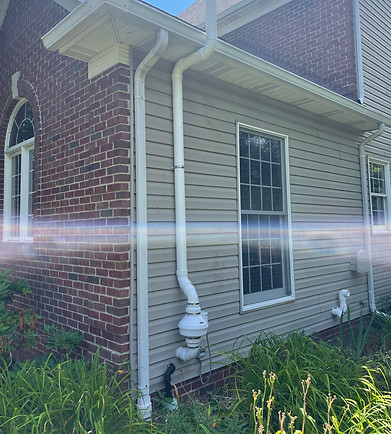
SUB SLAB DEPRESSURIZATION CORE SYSTEMS
STEPS FOR INSTALLING:
-
Drill / “core” a 4 to 6 inch hole in the concrete slab
-
Remove soil to create a pit area under the slab opening; the more surface area of soil exposed in the pit, the better.
-
Connect the “pit” to the radon fan with a PVC pipe pathway. This vents the soil gasses and reduces the sub-slab pressure. On homes with compacted soil, consider connecting a second core to achieve maximum “communication” to spread the negative pressure field under the home. [This can also be done later if necessary.]
-
Exit the home; usually to the exterior of the home (sometimes to attic or garage if an interior system is desired).
-
Attach Radon fan.
-
Construct exhaust 1 to 2 feet beyond the roofline
-
Mitigated homes should be retested no sooner than 24 hours (nor later than 30 days) after installation to verify performance. Retests should be conducted every two years.
-
The exhaust discharge shall be at least 10 feet above ground level, 10 feet away from any opening that is less than two feet below the discharge, and above or at the eave of the roof.
-
Radon fans should not be located inside the living area or in crawlspace. They can be in an attic, outdoors, or in a garage
-
There should be a fan function indicator (manometer) located in plain sight that will show the occupant that the system is operating.
These are Radon Mitigation Systems that utilize existing rainwater drainage systems. They’re most often found on homes built since the 1980’s. These homes often have a sump pit for that is attached to a “Perimeter Drain,” “French Drain,” or a “Drain Tile System.” That drainage pathway is very efficient at moving air underneath the entire basement. When we leverage this “air highway” to create an under slab vacuum for radon mitigation…we tend to get outstanding results.
STEPS FOR INSTALLING:
-
Create and install an airtight lid for the sump pit.
-
Create a penetration in the lid for the radon pipe and possibly the pump water
discharge pipe. -
Create and connect the PVC pipe pathway to remove the soil gasses and reduce the sub-slab pressure.
-
Exit the home; usually to the exterior of the home (sometimes to attic or garage if an interior system is desired).
-
Install Radon fan.
-
Build exhaust pipe 1 to 2 feet beyond the roofline
SUMP DRAIN TILE MITIGATION SYSTEMS
SUB-MEMBRANE
DEPRESSURIZATION SYSTEMS
Used on homes with crawl spaces / exposed dirt as part of the foundation. In these systems we seal the crawl space with a vapor barrier and use the radon system to create a vacuum under the membrane which limits entry and vents the radon to a safe location outside the home.
STEPS FOR INSTALLING:
-
A high density polyethylene vapor barrier is laid on the soil.
-
The seams are sealed, and the edges are sealed to the foundation walls.
-
We then Install corrugated, perforated landscaping pipe beneath the plastic.
-
Connect the PVC pipe pathway to the under-plastic piping to remove the soil
gasses and draw the membrane down tight against the soil. -
Exit the home; usually to exterior of home (sometimes to attic or garage if an
interior system is desired). -
Attach Radon fan.
-
Construct exhaust 1 to 2 feet beyond the roofline
On some houses, it’s necessary to combine the above systems. On a house with a crawl space and a basement but no sump pit we’ll sometimes do a “Core + Membrane” System.
COMBINATION RADON MITIGATION SYSTEMS
